

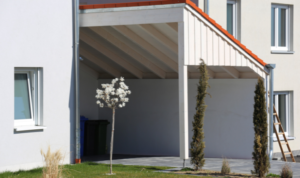
A good carport keeps vehicles shaded, cleaner, and easier to access without the full cost of a garage.
If you are researching how to build a carport for your property, All Good Roofing and Additions recommends starting with the same basics professionals use: layout, permits, structure, roof pitch, drainage, and the right materials for your local weather.
Learn The Basics: How to Build a Carport That Actually Holds Up
Before buying lumber or ordering a single-car carport kit, decide what the structure needs to do. A small sedan, a full-size truck, a boat, or an RV all need different clearance.
A home-made carport can work well, but only if the plan matches the vehicle, soil, wind exposure, roof weight, and driveway layout.
Most one-car carports are around 12 feet wide by 20 feet long. That gives enough door clearance without feeling cramped.
A DIY 2-car carport usually starts at around 20 by 20 feet, though 22 by 24 feet works better for larger vehicles. Meanwhile, a 3-car carport kit can stretch 30 feet or wider, which means the frame and roof support need more careful engineering.
Think through these early choices:
- Freestanding or attached to the home
- Open sides or partial side panels
- Flat, shed, gable, or arched roof
- Wood, steel, or aluminum frame
- Polycarbonate, shingles, or metal roof panels
- Concrete slab, existing driveway, gravel, or individual footings
A freestanding carport is usually simpler for a do-it-yourself carport because it does not tie into the house roof. An attached carport can look more finished, but it also brings flashing, ledger attachment, drainage, and wall connection issues.
Check Codes, Permits, and Utility Lines First
Learning how to build a carport starts with paperwork, even if that part feels less exciting than framing. Most cities treat carports as accessory structures. Some require permits based on size, height, setback, anchoring, electrical work, or whether the carport is attached to the house.
Call the local building department before digging. Ask about setbacks from property lines, maximum structure height, drainage rules, wind load requirements, and inspection steps.
In Texas, wind uplift matters, especially for open-sided structures. A roof that catches air like a sail needs anchors, bracing, and fasteners sized for the job.
Choose the Right Carport Plan
Plans are where projects start well. Flat-roof carport plans are popular because they look simple, but a truly flat roof is rarely a good idea.
Even a low-slope roof needs enough pitch to move water away. Many lapped metal roof systems require more slope than homeowners expect, while some standing seam systems can handle lower slopes when installed correctly.
For a basic do-it-yourself carport, a shed roof is often easier than a gable roof. One side sits higher, the other side sits lower, and water drains in one direction. Gable roofs look more like a small garage roof, but they need ridge beams, rafters on both sides, and more trim work.
A kit can save time if you want predictable parts. A single-car carport kit is practical for a small driveway. A DIY 2-car or 3-car carport kit may still be manageable, but larger spans leave less room for guesswork.
If the plan includes wide spacing between posts, ask for the engineering details before buying.
Set the Layout and Footings
Mark the carport location with stakes and string. Measure the diagonals to square the layout. If both diagonal measurements match, the rectangle is a square.
Leave room for doors to open, walking space around vehicles, and roof overhangs that do not dump water where people step out.
Footings depend on soil, structure size, and local code. Many carports use posts set in concrete, post bases bolted to concrete piers, or anchors fastened to a slab.
Posts buried directly in concrete can be strong, but wood posts require a ground-contact rating and moisture protection. Steel posts need corrosion protection where they meet concrete.
A simple process looks like this:
- Mark post locations.
- Dig holes to the required depth and width.
- Add gravel at the bottom for drainage where allowed.
- Set forms or place posts.
- Check plumb, square, and spacing.
- Pour concrete and let it cure before heavy framing.
Do not rush the cure time. A frame can shift if the concrete is still soft. For larger structures, temporary bracing keeps posts upright while the concrete sets.
Build the Frame
The frame carries the roof and transfers loads into the ground. In building a carport, straight lines, level beams, and strong connections matter.
Start with posts, then add beams along the long sides. Use approved structural fasteners, not random deck screws.
Carriage bolts, through-bolts, brackets, hurricane ties, and manufacturer-approved screws all have a place. The right choice depends on the frame material and local load requirements.
For a wood carport, pressure-treated posts and beams are common. Cedar looks better, but it still needs proper sizing and maintenance. Steel and aluminum frames resist insects and rot, but they require compatible fasteners and careful anchoring. Mixing metals without the right hardware can lead to corrosion.
After beams are installed, add rafters or purlins according to the plan.
Spacing depends on the roof material. Metal roof panels are often attached to purlins, while shingles usually require decking. Polycarbonate panels require support spacing per the panel manufacturer’s instructions.
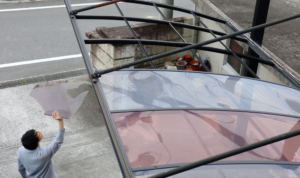
Install Roof Panels and Flashing
Metal roof panels are a strong choice for carports because they shed rain well, withstand sun exposure, and come in long runs that reduce the number of seams.
They still need the correct slope, overlap, screws, closure strips, and trim. A roof leak usually starts at a fastener, lap, edge, or poorly flashed connection.
Begin panel installation square to the frame. If the first panel is crooked, the problem grows across the whole roof. Use screws with neoprene washers, and drive them straight. Overdriven screws can crush washers.
Underdriven screws can leak. Trim pieces, ridge caps, sidewall flashing, and drip edges finish the roof and help direct water away from the frame.
Add Gutters, Bracing, and Final Details
A carport roof needs water control. Without gutters, runoff can splash mud, soak posts, or create slick spots near the vehicle. Downspouts should send water away from the slab and foundation.
Bracing is just as important. Knee braces, diagonal bracing, or engineered connectors help reduce sway. Open sides make carports comfortable, but they also expose the structure to wind from multiple directions. Skipping bracing can make a good-looking build feel shaky.
Finish with paint, stain, sealant, end caps, post base trim, and protective coatings where needed. If electrical lighting is part of the plan, use a licensed electrician. Outdoor fixtures, conduit, outlets, and switches need weather-rated components.
When a Kit Makes Sense
A kit is useful when the manufacturer provides engineered parts, clear instructions, and hardware that matches the frame.
A single-car carport kit can be a good weekend project for experienced homeowners with help. On the other hand, building a DIY 2-car carport may take several days due to layout, anchoring, roofing, and alignment. A 3-car carport kit is closer to a small building project than a simple shade cover.
Read the kit warranty and wind rating before purchase. Also, check what is not included. Some kits require separate anchors, gutters, tools, permit drawings, or concrete work.
Final Thoughts
Understanding how to build a carport helps homeowners plan smarter, even if they later hire help. The best builds start with proper sizing, safe footings, a straight frame, reliable roofing, drainage, and code-compliant anchoring.
A do-it-yourself carport can be rewarding, but it should never be treated like temporary shade if it will protect vehicles year-round.
For homeowners who want a cleaner finish, stronger structure, or an attached design, All Good Roofing and Additions can help with carports, patio covers, roofing, sunrooms, and outdoor living projects that fit the home rather than look like an afterthought.